
Homemade Whipped Cream Recipe. Learn how to make homemade whipped cream with just three simple ingredients! This easy recipe produces rich and creamy whipped cream, perfect for enhancing desserts, coffee, and more.

Homemade Whipped Cream Recipe
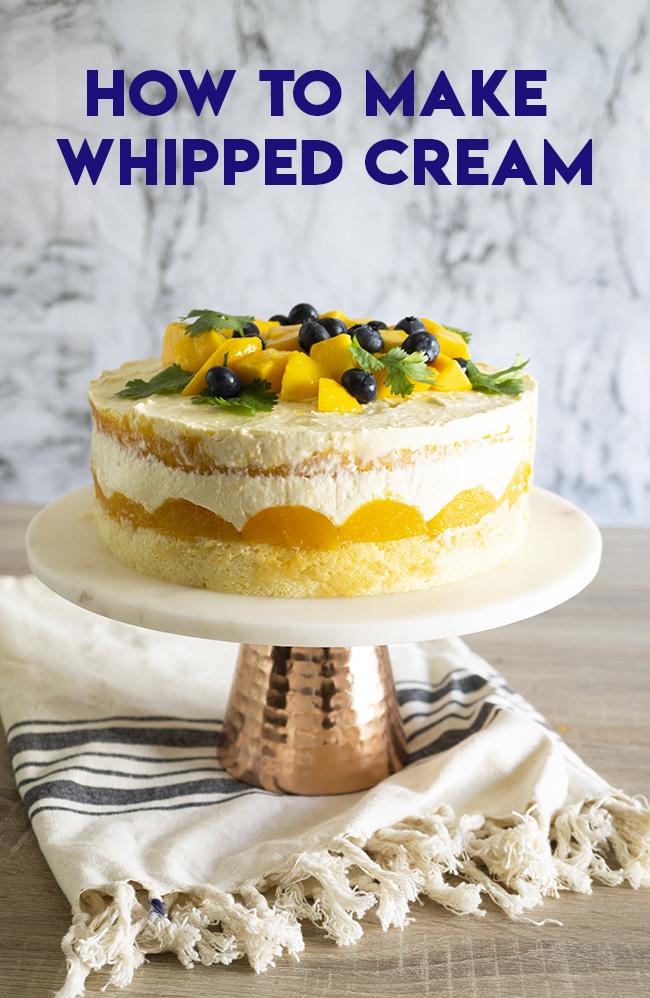
Hey, everyone! Today, I’m excited to share how to make whipped cream. Yes, you heard me right! After reading this post, you can whip up your own whipped cream, and I promise it’s very easy to make. If you check my previous posts on making ladyfingers and my mango cake recipe, you’ll see I used this whipped cream recipe to frost those desserts. Since I plan to make more cakes in my upcoming posts, I thought it would be the perfect time to share this whipped cream recipe with you.
Why You’ll Love It
In my household, whipped cream is a staple that we always have on hand. I use it as frosting for cakes, in Japanese fruit sandwiches (fruit sando), and in coffee. Sometimes, we even enjoy it on its own! Because we use it so frequently, buying it can get expensive. That’s why I make our own whipped cream at home. This is my homemade whipped cream recipe, and today, I will show you how to make it and why you will love it.
- Fresh, Unmatched Flavor– Homemade whipped cream boasts a light, airy texture and a fresh, rich taste that store-bought versions can’t match. Without artificial stabilizers or preservatives, the pure cream flavor shines through.
- Customizable Sweetness and Flavors: You control the sweetness and flavor. Everything is fully customizable if you prefer lightly sweetened cream or want to add vanilla, almond extract, or even a pinch of cinnamon.
- No Additives, Just Goodness: Store-bought whipped cream often contains additives. Making your own ensures you know exactly what goes in: cream, sugar, and optional natural flavorings.
- Quick and Simple: You can enjoy freshly whipped cream made from scratch in less than 10 minutes. This straightforward process is both rewarding and delicious.

Homemade Whipped Cream Recipe
Homemade whipped cream is easy to make, tastes infinitely better than store-bought, and is highly versatile. Whether you’re topping a cake, pairing it with fruit, or indulging in a creamy coffee, this classic treat adds a touch of luxury to any dish. With the tips and tricks shared here, you’ll master the art of whipping up perfect, fluffy cream every time.
So, next time you’re tempted to grab a can, remember: a rich and satisfying homemade version is just minutes away!
Ingredients
- Heavy Whipping Cream cream (minimum 36% fat content), which you can buy from the groceries, will work too.
- Granulated Sugar
- Vanilla Extract
Instructions
- Chill Your Tools– Place your mixing bowl and beaters (or whisk attachment) in the freezer for 10-15 minutes. Chilled tools help the cream whip faster and achieve a firmer texture.
- Add Heavy Cream to the Bowl-Pour heavy cream into the chilled Bowl. Using a high-fat content cream ensures rich, stable whipped cream.
- Begin Whipping-Start whipping the cream at medium speed using a hand, stand, or whisk. After 1-2 minutes, the cream will begin to thicken.
- Add Sweetener and Flavor: Add white granulated sugar and vanilla extract once the cream thickens. Continue whipping until soft peaks form and the cream gently folds over itself when lifted.
- To achieve the Desired Consistency, Whip to stiff peaks for piping or firmer toppings. Be cautious not to overwhip, as the mixture can turn into butter.
- Serve Fresh-Your homemade whipped cream is now ready. Use it to elevate desserts like pies, cakes, waffles, or your morning coffee.
Tips for Perfect Whipped Cream
- Keep Ingredients Cold: Cold cream and chilled tools result in faster whipping and better texture.
- Don’t Overwhip: Stop when you reach the desired consistency to avoid grainy or buttery textures.
- Experiment with Flavors: Add almond extract, cocoa powder, or a splash of liqueur for unique variations.
- Make it Dairy-Free: Substitute heavy cream with coconut cream or plant-based alternatives for a dairy-free version.

Common Mistakes to Avoid
- Using the Wrong Cream: Always use heavy or double cream for the best results. Lower-fat creams won’t whip correctly.
- Whipping Too Slowly: Start at medium speed, then increase to high for consistent results.
- Adding Sugar Too Late: Add powdered sugar when the cream thickens for the best texture.
- Overwhipping: Stop at soft or stiff peaks to prevent the cream from turning grainy or separating.
- Skipping Cold Tools: Warm bowls and beaters can hinder the whipping process.

How to Store Homemade Whipped Cream
- Refrigeration: Leftover whipped cream can be stored in an airtight container in the fridge for 2-3 days. Gently re-whip it if it loses its fluffiness.
- Freezing Whipped Cream-Transfer to a freezer-safe container for up to 1 month. Use as instant dessert toppings, though the texture may vary slightly after thawing.
Homemade Whipped Cream Recipe
Equipment
- 1 electric mixer
- 1 Electric Mixing bowl
Ingredients
- 1 cup Heavy Whipping Cream
- 1/4 cup sugar
- 1 teaspoon Vanilla Extract, optional
Instructions
- Chill Your Tools– Place your mixing bowl and beaters (or whisk attachment) in the freezer for 10-15 minutes. Chilled tools help the cream whip faster and achieve a firmer texture.
- Add Heavy Cream to the Bowl-Pour heavy cream into the chilled Bowl. Using a high-fat content cream ensures rich, stable whipped cream. The heavy Whipping Cream from Walmart worked fine. Do not use plastic or greasy bowls; the mixture will not curd.
- Begin Whipping-Start whipping the cream at medium speed using a hand, stand, or whisk. After 1-2 minutes, the cream will begin to thicken.
- Add Sweetener and Flavor- Once the cream thickens, add granulated sugar and vanilla extract. Continue whipping until soft peaks form, where the cream gently folds over itself when lifted.
- Achieve Desired Consistency-For piping or firmer toppings, whip to stiff peaks. Be cautious not to overwhip, as it can turn into butter.
- Serve Fresh-Your homemade whipped cream is now ready. Use it to elevate desserts like pies, cakes, waffles, or your morning coffee.
Video

Welcome!
Hi, my name is Shobee. Welcome to The Skinny Pot, where we cook Easy Recipes from the available ingredients from our pantry and fridge! We’re your go-to source for simple and delicious recipes that make the most of what you already have at home. Talk about the pantry challenge. Read more...


Leave a Reply