
Best Pandesal Recipe plus step by step video. This is the Best Pandesal Recipe you can use plus a step-by-step video. This post is the most commented post in the blog in which raving readers who tried it have been using this recipe since.
for more bread recipes: Try this Ube Pandesal with Cheese
")
WHAT IS PANDESAL
Table of Contents
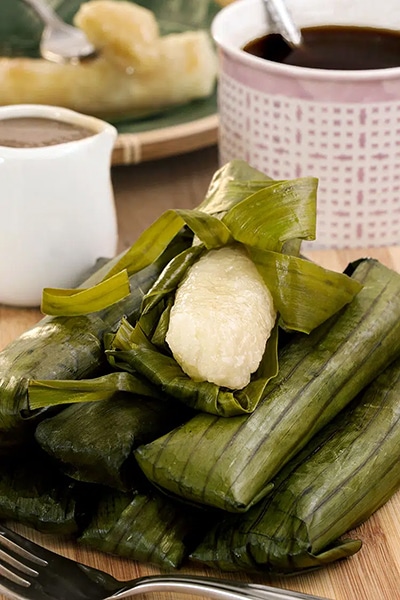
Pandesal is a Filipino bread coated with crust. It is baked for a shorter period of time, to get a crusty top and soft and fluffy inside. It is a traditional Filipino bread usually served in the morning for breakfast and around 3 PM in the afternoon as a mid-day snack.
When you are vacationing in the Philippines, the chances of you hearing a manong (older man), on his bike with a Pandesal basket on the back is 99.9 percent. This is just the way it is, a Filipino tradition in which most people eat Pandesal as breakfast. OR bakeries are selling Pandesal in the early dawn and usually, the Pandesal supply is gone around 8 in the morning, and then, it is baked again for an afternoon snack at 3 PM.
This bread is not just “bread” per se. It is one part of my Filipino culture which was deeply ingrained in me. But when I came here to the US, I had stopped eating just because it is not available and because I was just simply lazy to make my own. When I went home this year and my children tasted Pandesal for the first time and liked it, I cannot help but be embarrassed by myself and guilty at the same time.
How crazy was I to let my children be ignorant about this Filipino tradition? But it is not too late. I can make it and remind them of our roots. I made sure this recipe will taste similar to what they tasted in the Philippines.
I’ve tried out two recipes but they did not work out, so from those trial and error, I was able to come up with this this recipe that worked.
The fluffiness, the sweetness of this Pandesal is spot on. I am sharing it with you, guys! I believe that Filipino children raised in any part of the world should experience this Pandesal tradition….just like what I am doing now. So hop into the bandwagon and let’s get baking. CHECK OUT THESE CINNAMON ROLLS TOO: MY FIRST SUCCESSFUL CINNAMON ROLLS WITH WALNUTS, HOW MUCH DOES IT COST TO ENJOY CORON PALAWAN, PHILIPPINES.
How to Make your Pandesal?
There is no secret in making Pandesal. The ingredients are simple. It has to be fermented with yeast to achieve its fluffy bread dough and to make it sweet, there is a small amount of sugar added to the dough. It is then baked for 20 t0 25 minutes, sometimes even 15 to 20 minutes depending on your oven.
Some websites used a bread machine to make their Pandesal just like this site right here, but I cannot guarantee if soft or fluffy, but you can try it just for kicks.
TRICKS TO MAKE AIRY PANDESAL:
- By the smell. You don’t want to bake it for a long time. When you smell the bread, that is when you get prepared and check it. Sometimes it is ready to pull out from the oven. Usually about 20-25 minutes. So whiff that smell.
- After checking the bread when you can smell it, tap it. When it is hollow, then it is ready.
- The dough. Fold the dough. Watch the video on how I did it. I tried making Pandesal so many times and failed because I did not fold the dough, it came our hard as a rock. Also, do not over knead.
If you follow this Pandesal recipe, you will be able to make a soft and fluffy Filipino, traditional that actually tastes similar to the one we have in the Philippines.
FOR MORE BREAD RECIPES CLICK ON THE LINK
- SPANISH BREAD -Soft and fluffy Spanish bread recipe and step-by-step video for your sure success. Easy list of ingredients that are pantry staples, and clear guidance in using them, and detailed recipe instruction.
- SIOPAO RECIPE/STEAMED BUNS –An easy way to make siopao filling. Quick to follow recipes and ingredients that are easily available. Make Siopao now.
- UBE PANDESAL-Soft, fluffy and surprisingly easy to make Ube Pandesal with Cheese. I will show you how to make it, with these easy-to-understand recipe instructions.
- ENSAYMADA- This Ensaymada recipe is no-fail and easy to follow. It will be 12 pieces of fluffy bread and it is perfect for a Filipino party or occasion you may have. Double the recipe to make more and share with everybody.
- EMPANADA is a revised version of what I was used to in the Philippines. Instead of deep-frying these Chicken Empanadas, I opted to bake them so that they will not be too greasy and oily. For these Empanada fillings, I used ground chicken so that it is higher in protein and a bit healthier.
Pandesal Recipe
This is the Best Pandesal Recipe plus Step by step video got 500 plus comments from raving readers who tried it, and it is the number one traffic drawing in the blog.Check it out!
Ingredients
- 4 cups all purpose flour plus 1/2 cup to sprinkle on the table
- 1/2 cup sugar
- 1 egg beaten (room temperature)
- 1 teaspoon salt
- 1 pack rapid rise yeast 1 sachet is 2 1/4 tsp
- 1/2 cup water
- 1 cup milk fresh
- 1/4 cup canola oil
- 1 tablespoon oil to grease the dough bowl
- 1 cup Bread Crumbs for coating
Instructions
- Place the flour and yeast , in a large mixing bowl mix and make a well in the middle. Set aside. In a separate bowl, mix water, oil,sugar,salt and milk until the sugar dissolves and heat it for to warm temperature 105 - 107.OR YOU CAN JUST PUT SUGAR AND SALT WITH THE FLOUR. Pour mixture into the middle of the flour and mix twice then add the egg.Continue mixing until you will get a soft,fluffy dough. This will be a gooey dough but it is how it should be. When the dough is ready, coat your hands with flour so that the dough will not stick onto your hand and form it into the ball and transfer the dough into a greased bowl. Let the dough sit in the warm place for an hour.
- Here the trick to have an airy Pandesal :After an hour, transfer the dough in a gently floured surface and directly (do not knead) gently form it into rectangle 4 " in width and 20 " in length and then fold to form a log. Cut the dough into 20 or more (depending on the size you want) pieces in a slanting form,shape them and roll them in a breadcrumbs.Arrange the dough 1' between them. Sprinkle the dough with more crumbs and let it rest in a warm place for another hour.
- When ready, Preheat oven at 300 F and bake the Pandesal for 20 to 25 minutes OR when it is lightly brown on top.Enjoy! Store leftover pandesal into the freezer for until a month.
- NOTE: Please read on the comment below,since anonymous did not have a success on it 🙁
- ADDITIONAL TIP: Preheat oven int its lowest setting, for my oven it is 125 F for 2 minutes then turn it off . I use this as the warm place where I can keep rise my dough for two hours. I call it "kinda hot" place for my dough to rise.
Video


Welcome!
Hi, my name is Shobee. Welcome to The Skinny Pot, where we cook Easy Recipes from the available ingredients from our pantry and fridge! We’re your go-to source for simple and delicious recipes that make the most of what you already have at home. Talk about the pantry challenge. Read more...


Cindy says
I tried this and it tasted very good. I was wondering if the ingredients are the same if you use active dry yeast instead of the rapid rise yeast. Thanks for sharing!
shobee says
You are welcome. I am glad it worked for him… Keep on visiting.
Joy says
My son tried this pandesal recipe this morning after looking through different variation ( only his 2nd attempt).Success,actually look like the picture and taste so good.
Thank you for sharing the recipe.
shobee says
You are welcome…
Anonymous says
Pandesal is my son’s favorite snack! Living overseas freshly baked GOOD pandesal is hard to find. Some bakery sells hot pandesal but it is best to consume it the same day you bought it (a day old pandesal tends to be hard)
We had tried several pandesal recipes but your recipe is the BEST!! No more store bought pandesal for my son and family!!!
Thank you for sharing!!
shobee says
I am glad it worked for you .. You are welcome and thanks for visiting !!!
wil1571 says
Your recipe rocks! I’ve been trying different pan de sal recipes but when I tried yours – Bam! Just like how the neighborhood ‘Panaderia’ would make it! Thanks for sharing!
shobee says
Hi! Mix the instant yeast with the flour …. make sure you warm the liquid ingredients
Dada says
Hi. I cant find active dry yeast at grocery store. I saw only Instant Yeast. do i need to dissolved it at warm water first Or can i mixed it directly to all ingredients?
shobee says
You just do it the same as the instruction but mix it using your hand… it will be sticky, but you can drench your hand with flour so that it will not stick as badly…:)
Anonymous says
Hi! How can i make this recipe without a mixer? I don’t have a stand mixer.. 🙁
shobee says
Yes, because when I tried kneading it before, the pandesal turned out heavy and not airy:)
Anonymous says
I noticed that you didn’t knead your dough. Is there a reason for that?
shobee says
Hello, Lei . 1. I am using an electic mixer, particularly the stand mixer, the stand mixer has a metal mixing bowl, and I used that. 2. I place the flour and the yeast together in the electric mixer’s bowl, mix them, there is no liquid yet,to incorporate and make a well in the middle and then position it in the mixer stand.For the liquids, I use a separate bowl to mix them together and microwave it to warm it up. I then pour the warm liquids to the electric mixer’s bowl containing the flour and yeast and mix ( around two turns of the mixer hook) twice at 3 speed or medium . The liquid and the flour mixture will be slightly incorporated and then add the egg. This time, mix completely to make a very soft,smooth dough… this will be gooey. Transfer to your prepared greased deep bowl to let the dough rise. After, just put it in a floured surface and flatten and then fold… the length and width of the rectangle will tell the size of your pandesal. pay attention when baking because these pandesal cook quicky. What I do, if it is hollow when tap on the top, it is cooked… you can bake longer to make it golden brown but it will be a little overcooked underneath.
Please let me know if you have question and I hope it works for you… 🙂
Lei says
Hi
I love pandesal
Want to ask when you mix the liquid ingredients to the flour mixture by hands? Or using mixer? And what do u mean by mix twice then add the egg? How long does it takes to mix the mixture to become soft and fluffy dough?
And this recipe doesnt require kneading?
shobee says
I am so glad it worked for you.My family loves this too…:)
Marjoe white says
At first i thought it wasnt gonna turn out good kasi the dough was very sticky but after kneading and used the 1/2 cup flour the texture turned out fine at nung na bake na omg it wassss so good! Thank you for sharing your recipe!my picky 3 yr old daughter and husband like them too!
shobee says
I hope it works for you.I tried it in different temperature (325,375), and baked it in different times too; but the 300 and 20-25 minutes works well for me. Please let me know how it turned out for you 🙂 You are lucky you live in California, that means no snow for you. Stay safe.
Anonymous says
Hi I’m in California and I’m doing this now. Baking at 300degF now. Hope it turns out great. I’ve never baked at 300 before but I hope I got that right. The dough turned out great following the previous instructions though 🙂 heated my liquid mixture up to 120deg though, as the instruction indicated in the Rapid Rise Yeast packet.
shobee says
I hope it will work for you. I made it again and I had some liver spread with it 🙂 I am going to make empanada and ensyamada soon… look forward to it.